The virtual camera makes it possible to easily create camera pan, zoom and rotation effects in your animation without having to move all the figures. Instead you move a camera viewport, which when in its default position is aligned with the boundary of the animation. What you see when you play or export the animation is the area contained within the camera viewport, but transformed back to the animation area. Shrinking the camera viewport will therefore creating a zoomed in effect, while moving it to the right will pan animation objects to the left. Use the preview frame feature (Ctrl+P) to quickly see how the frame will look from the perspective of the camera.
Note that key frame thumbnails shown in the
timeline are from the perspective of the camera so that they show what you would see when playing the animation.
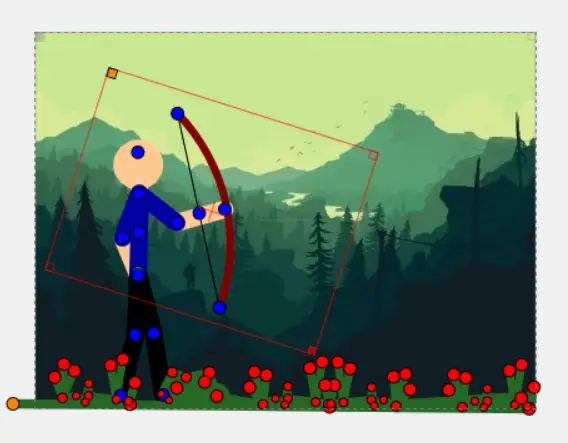
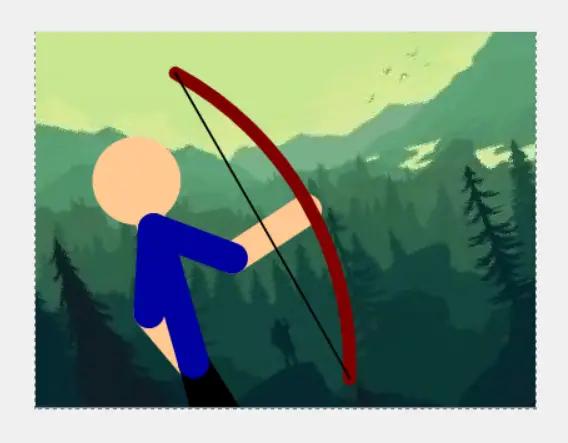
The camera viewport positioned in the frame editing canvas (left) and the result when the frame is previewed (right)
The grey onion skin of the camera viewport from the previous frame is visible in its default position (left)
Showing / Hiding the Camera Viewport
The camera viewport is not visible unless the '
Show Virtual Camera' option is selected in the View menu. This option is stored so that it is persists after closing and re-opening Pivot Animator. The
keyboard shortcut Ctrl+K can be used to quickly toggle the option on or off.
The camera viewport will always be shown when editing a key frame in which the camera is not in its default position, even if 'Show Virtual Camera' is unselected, although the viewport will be faded out and you won't be able to position it.
Positioning the Camera Viewport
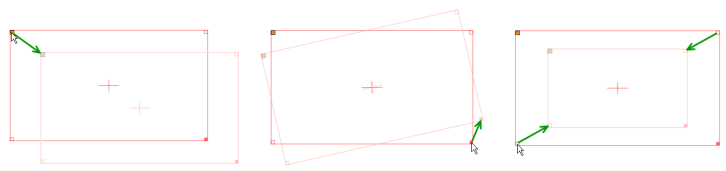
The camera viewport can be moved, scaled or rotated by dragging the square handles at the corners of the rectangle. The center of the viewport is shown with a red cross. Note that rotation and scaling of the viewport is always around the center. The aspect ratio of the viewport always matches that of the animation.
Moving, rotating and scaling of the camera viewport by dragging the square handles.
Either of the indicated handles can be used for scaling (right).
The camera viewport can be restored to its default position (aligned with the animation area) by clicking '
Reset Virtual Camera' in the View menu or by using the
keyboard shortcut Ctrl+Alt+K.
The camera viewport can also be copied by selecting 'Copy Virtual Camera' from the View menu or by using the keyboard shortcut F11. The viewport can then be copied to another frame or another animation by selecting 'Paste Virtual Camera' from the View menu or by using F12.
The current pose of the camera is shown in the status bar at the bottom of the main window when 'Show Virtual Camera' is selected.
The camera viewport can also be positioned accurately by using the arrow keys, while the mouse cursor is positioned over a handle, to move that handle in 1 pixel increments. The cursor won't move with the handle, but the arrow keys will continue to move that handle until the cursor is moved. Even finer positioning using the arrow keys can be achieved by first
zooming in. For example, zooming to 400% and pressing an arrow key while the cursor is over the orange handle is equivalent to moving the viewport by a quarter pixel.

The camera viewport can be aligned to match its pose in the previous frame using the L key (or L+Shift to align to the next frame) while the cursor is positioned over one of the camera handles. Using the L key over the orange handle will align the center of the viewport without changing rotation or scale. Likewise, using the L key over the rotation or scale handles will change only rotation or scale without affecting anything else.

The camera viewport can also be set to any set of position values using '
Input Camera Values' in the Edit menu, which will appear after clicking a camera handle. You can also use the 'I' key while the cursor is over a camera handle. This works similar to the input for
figure positioning and allows you to set the angle, scale and position to specific values. When scale is 1, the camera viewport matches the animation dimensions. The position is relative to the center of the camera viewport.
Any movement of the camera viewport can be undone in the usual way by clicking 'Undo Move Camera' in the Edit menu or using the keyboard shortcut Ctrl+Z.
Positioning in Multiple Frames
The camera viewport pose can be updated in multiple frames at once. Firstly select the frames in the timeline and then move, rotate or scale the camera by dragging the handles. A message box will appear asking if you want to apply the change to all selected frames. The changes are applied relative to the current camera pose in each frame, so they will be offset by the same amount that the camera was offset in the frame being edited. This means that if the camera poses are all different in the selected frames, then they will remain all different after the update, but will all be offset from their previous poses.
Camera Inbetweening
The camera can be
inbetweened in the same way as figures to easily create smooth pan or zoom effects with two or more key frames.
Auto-easing can also be used for smoother transitions between key frames and to create acceleration effects.
Note that when inbetweening between different camera scales the objects in the camera view can appear to speed up or slow down. This is because a change in scale has a bigger effect when the camera viewport is smaller compared to when it is larger. However, auto-easing can be used to prevent this effect. For example, when zooming in from a scale of 1 to 0.25 you can use 3 key frames instead of 2 and set the scale to 0.5 for the middle key frame. The scale will then change by a constant multiple (0.5) between key frames so that objects in the camera view increase size at a constant rate. If changing the camera position at the same time, then the position must also be set with non equal offsets.
Creating a pan and zoom sequence using 2 key frames (left) and 3 key frames with auto-easing (right)
The camera scales on the left are 1 and 0.25. The scales on the right are 1, 0.5 and 0.25
The inbetweens values are 14, -1 on the left and 7, 7, -1 on the right
The resulting looping animations showing the acceleration effect with 2 key frames (left)
and constant speed with 3 key frames (right)
Including Areas Outside the Animation
It's possible to position the camera viewport however you like, even to include areas that are outside the animation area. For example, moving or rotating the viewport from its default position will include areas outside the animation area (apart from a rotation of 180°). How these areas look when the animation is played or exported will depend on the type of
background used.
Solid backgrounds, such as the default white background, will fill areas outside the animation area with the same solid colour.
Gradient backgrounds will extend the gradient to fill areas outside the animation area.
Image backgrounds will fill areas outside the image with solid black. If the aspect ratio of the image is not equal to the aspect ratio of the animation then some portion of the image will be visible to the right or bottom of the animation area.
Note that when inbetweening the camera viewport there may be cases in which the viewport is fully inside the animation area in all key frames but contains areas outside the animation in the generated inbetween frames.