Backgrounds are images, solid colours or gradients that can be set as the background of a frame. Different frames can contain a different background, which means that you can create different scenes and settings within a single animation. A background image can be created in MS Paint or other graphics software or downloaded from the internet.
Image Backgrounds

A background image can be loaded into the animation by clicking '
Load background' in the File menu. Supported image file formats are Bitmap, JPEG, GIF and PNG. The image resolution will be maintained and will be fitted to the animation dimensions. If the aspect ratio of the image differs to the aspect ratio of the animation, then part of the image will be outside the animation to the right or bottom and will be shown faded out while editing the frame. This makes it possible to use images that are a higher resolution than the animation so that zooming in using the
virtual camera results in less pixelation of the background.
Solid Colour Backgrounds
A background with a solid colour can be set by clicking '
Set Background Colour' in the File menu. Make sure that 'Solid Colour' is selected in the Background Colour window, select a colour and click Add. You will be asked to name the new background unless an identical background already exists. The default background is a solid white colour. Using solid colours or gradients is quicker than creating and loading an image and uses much less memory in the .piv file. Note that colours can have opacity, which makes it possible to
export the animation to formats that support transparency.
Linear Gradient Backgrounds
A linear gradient is a fade between two colours in a given direction. The sky on a clear day is often a linear gradient between two shades of blue. A background with a linear gradient can be set in a similar way to a solid colour by selecting 'Linear Gradient' in the Background Colour window. Select the two colours of the gradient and position the two gradient control points in the rectangle to the right by dragging them. Note that the control points can be positioned outside of the rectangle area and even outside of the window if required. The only way to reposition them after dragging outside of the window area is to unselect 'Linear Gradient' and then select it again, which will reset the control points. Apart from using up much less memory than images, gradients appear much smoother when zoomed in, either when using
canvas zoom or the
virtual camera.
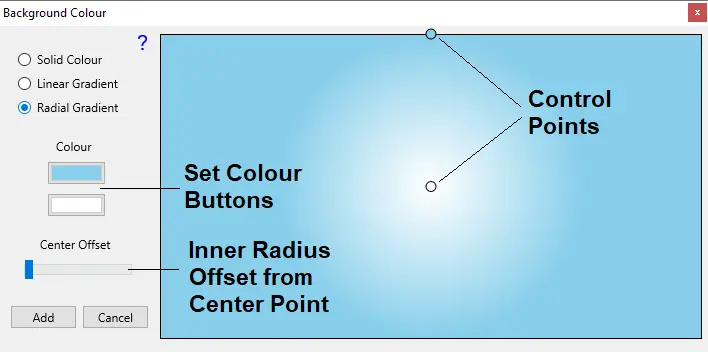
Radial Gradient Backgrounds
A radial gradient is a fade between two colours starting from a central points and going outwards. This can be useful for creating the effect of a glowing light source. Set a radial gradient by selecting 'Radial Gradient' in the Background Colour window. One control point in the rectangle sets the center of the gradient and the other sets the outer radius, outside of which there is no more fading (only the distance from the center point matters). The inner radius controls where the fading starts relative to the center and is set using the 'Center Offset' slider, where 100% sets the inner radius and outer radius to be the same.
The background colour window set for a radial gradient
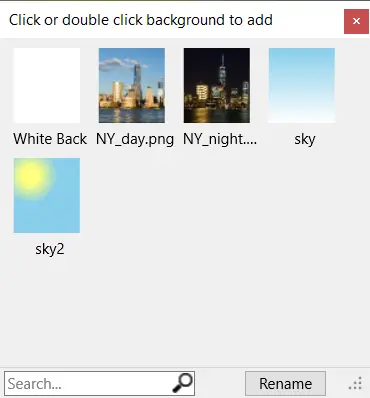
Background Selector
The background selector is similar to the
figure selector and provides a way to set the background to one that has already been loaded into the animation.
The background selector is displayed by clicking the 'Background' button in the main window when at least one background has already been loaded.
The figure selector also allows you to search for a background by name. Simply click the search box and start typing. Any background name containing the search term will be highlighted with bold text while all others will be greyed out. The scroll of the window will also automatically shift to the first highlighted item.
The Rename button allows you to modify the name of existing backgrounds. Click the Rename button and then click a background to rename. A naming window will then appear. Note that you cannot rename the default white background (first item) and names must be unique, so a message will be shown and renaming will fail if another background already contains the new name.
The background selector, showing the default white background,
two image backgrounds, a linear gradient and a radial gradient
Setting the Background for Multiple Key Frames
The background image can be set for multiple key frames by selecting key frames using the Shift key or Multi Select option in the right click menu, setting the background and then storing the changes by clicking the 'Update Frame' button or by selecting another frame in the time-line. Click 'Yes' when asked if you want to apply the changes to all selected frames or 'No' to apply to only the last frame selected.
Inbetweening
If
backgrounds are different between
inbetweened key frames then the inbetween frames will smoothly fade from one background to the other. This is the case whether the background has been loaded as an image or has been set to a solid colour or gradient by setting the background colour. To avoid fading when changing backgrounds, simply don't inbetween those key frames (set the inbetweens value of the last frame with the previous background to 0).
Fading from day to night by inbetweening between 2 key frames with different image backgrounds.
Note that a frame cannot contain a blend of more than two backgrounds. If the 'Add Selected Inbetweens to Timeline' feature has been used so that a key frame already contains a fade between two backgrounds, then you cannot fade between that key frame and a key frame containing a 3rd background in the expected way. One of the background images will be lost.