Buttons on the left hand side of the main window can be used to add new figures to the editing area and modify the current selected figure or figures. Hover the mouse cursor over a button to see what it does and the corresponding keyboard shortcut. A figure can be selected by clicking any of its handles.
Multiple figures can be selected by holding shift while clicking a figure, by dragging a box around the origin handle of figures or by using Select All Figures from the Edit menu (Ctrl+A).


The selected figure can also be changed by holding down the Ctrl key while pressing the left or right arrow keys or by using the mouse wheel while pressing the Ctrl key. The selected figure will then step through the figures.
From top to bottom the figure controls include:

Add Figure
Add a figure to the animation. If there's more than one figure type in the animation then the figure type selector window will appear (see below).

Delete
Delete the selected figures.

Edit

Centre
Move the selected figures to the centre of the animation area.

Flip
Flip or mirror the selected figures horizontally. Flip the figures vertically by holding the Ctrl key.

Colour
Change the colour of the selected figures using the colour selector. If a multi-coloured figure has had its colour set in this way then the button will be highlighted and clicking the button again will return it to its default multi-coloured state. See the colour selector section at the bottom of this page for more info.

Join / Unjoin
Join the selected figure to another figure. The button is disabled if multiple figures are selected. The origin handle of the selected figure can be joined to any other joint if it doesn't result in a closed loop of joined figures. After clicking the button, click one of the white handles to join the figure. Select the figure again and click the button again to unjoin them.

Raise
Move the selected figures in front of all other figures. If the Ctrl key is held then the selected figures will be raised by one layer only. The keyboard shortcut for raising a figure is Shift key + Up arrow.

Lower
Move the selected figures behind all other figures. If the Ctrl key is held then the selected figures will be lowered by one layer only. The keyboard shortcut for lowering a figure is Shift key + Down arrow.

Copy
Copy the selected figures. They can then be pasted into the same or any other frame or even into a different animation. The keyboard shortcut is Ctrl+C. Copied figure are independent of the OS clipboard and are stored even after the program is closed.

Paste
Paste the figures that were copied using the Copy button. The keyboard shortcut is Ctrl+V.

Scale
The percentage scale change of the figure from its default size. If multiple figures are selected, then the value shown is that of the first selected figure and all selected figures will be scaled to maintain their relative proportions. The value can be changed quickly by clicking in the box and dragging right or left, or even quicker by dragging up or down.

Opacity / Transparency
The percentage opacity / transparency of the selected figures in the range 0-255. The current value will be shown as a percentage as the value is changed. The value can also be seen by hovering the cursor over the control. The arrow keys can be used to change the value in small increments after clicking on the control. The value can also be changed in the colour editor after clicking the colour button.

Duplicate Figures (Edit menu)
Create an exact copy of the current figures and add them to the editing area. All properties of the figures are duplicated where possible. This does the same as copy and paste but places the new figures in a different position so that you know they've been duplicated. The keyboard shortcut is Ctrl+D.
Actions on Multiple Frames
Many figure actions can also be performed on multiple frames at once to save time. This includes paste figures, move figures, delete figures, set figure colour, set figure transparency, set figure scale, raise / lower figures and join / unjoin figures. If any of these actions are performed while multiple frames are selected then a message box will appear to ask if you would like to apply the change to the selected frames. Select Yes to complete the multi-frame action or No to only apply the action to the frame being edited.
Actions are applied only for figures with the matching ID (which is shown in the info bar at the bottom of the screen for the selected figure). When moving figures, the positions of figures in the selected frames will be offset by the distance moved so that they keep their positions relative to each other.
Note that multi-frame actions cannot be undone, so it's a good idea to save the animation beforehand just in case the result does not match expectations.
Adding Figures to the Animation
Figures can be added to the animation from an
STK file by clicking 'Load Figure Type' in the File menu.
Sprite figures can be added by clicking 'Load Sprite Image'.
STK figure files can also be dragged to the animation canvas from Windows Explorer. This also works with multiple selected files.
Figures can also be designed and added to the animation using the
Figure Builder. Open the figure builder by clicking 'Create Figure Type' in the File menu or by clicking the Edit button to edit the selected figure. Once a figure has been designed, add it to the animation by clicking 'Add to Animation' in the figure builder File menu.
Text objects can be added by clicking 'Create Text Object' in the File menu.
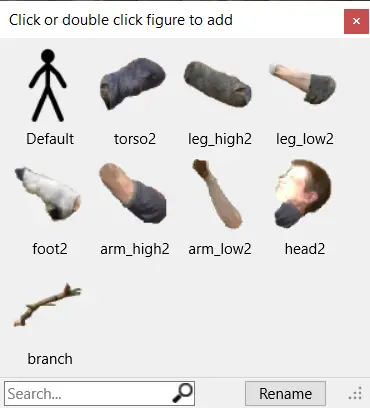
Figure Selector
The figure selector can be accessed by clicking the 'Add Figure' button when there is more than one figure type in the animation. It displays images of all figure types in the animation that have been created using the
figure builder or
text designer or loaded from
STK files. By clicking a figure type image, a figure of that type will be added to the frame editing area. Hover the mouse cursor over an image to read the full name of the figure type. The figure selector window is resizable. Double click a figure and the figure selector window will close after adding the figure.
The figure selector also allows you to search for a figure type by name. Simply click the search box and start typing. Any figure type name containing the search term will be highlighted with bold text while all others will be greyed out. The scroll of the window will also automatically shift to the first highlighted item.
The Rename button allows you to modify the name of existing figure types. This can be useful if you have a large number of figure types and want to make searching easier. Click the Rename button and then click a figure to rename. A naming window will then appear. Note that you cannot rename the Default figure type (first item) and names must be unique, so a message will be shown and renaming will fail if another figure already contains the new name.
The figure selector window, showing the default figure
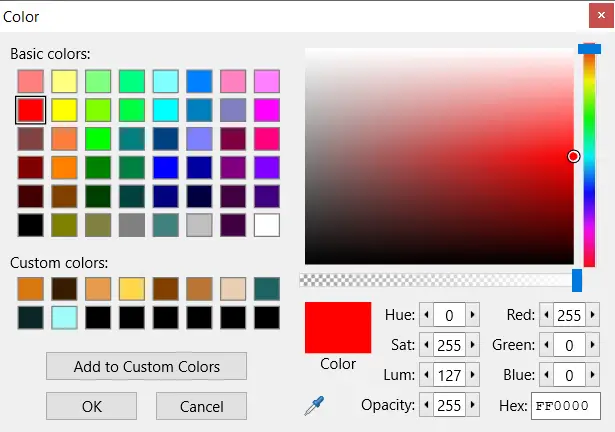
Colour Selector
The colour selector is used anywhere where a colour can be selected, including the figure colour button mentioned above, the segment colour button in the
figure builder, the text colour options in the
text editor and the background colour options in the
background colour editor. Using any of these will show the colour selector window, where colours can be selected in a number of ways.
The colour selector window with pure opaque red selected
The Basic colors section shows some commonly used colours, which cannot be changes. Custom colors can be added to by selecting a colour and clicking 'Add to Custom Colors', or by right clicking a particular custom colour. The custom colour is then stored in the next available slot, or the clicked slot if right click was used, and will remain there after closing and reopening Pivot. Hovering the mouse cursor over a colour will show the colour's hex code. Clicking a colour will select it. Click OK to close the window and apply the change.
Colours can be adjusted using the controls on the right hand side. The upper right hand side allows you to vary brightness and saturation of the current colour by dragging the circular handle. Hue can be adjusted using the slider on the right. The colour can also be entered manually into the boxes below by setting Hue, Saturation, Luminance or Red, Green, Blue in the range 0 to 255. The 6 character hex code can also be entered in the Hex box where the first 2 digits represent Red, the second 2 Green and the final 2 Blue. Hex codes are commonly used in web design and can be copied and pasted from websites such as this one.
Opacity / transparency can also be set to give your figures, text or backgrounds a translucent quality. This can be done by dragging the horizontal slider or by entering a value in the Opacity box, where 0 is fully transparent and 255 is fully opaque. Note that the transparency of selected figures will only be updated if the value was change in the colour selector. This makes it possible to change the colour of multiple selected figures without altering their transparencies.
 The colour picker / eye dropper tool can be used to select a colour from anywhere else on the screen. This is useful for matching the colours of other animation objects or even objects from other windows or from images on the internet. Clicking the button will cause the colour selector window to disappear temporarily. The cursor can then be moved around and the current colour under the cursor will be shown in the square box next to the cursor. Clicking will select that colour and the colour selector window will reappear.