Easing is a method used to smooth out movements between key frames by making objects accelerate or decelerate during inbetween frames rather than travelling at a constant speed in a straight line. Easing tends to make movements appear more natural since objects in nature rarely move at a constant speed and almost never change speed or direction instantaneously, as that would require infinite acceleration. A falling object for example will tend to accelerate towards the ground (unless it's falling very fast through the air).
Pivot can perform easing automatically while playing or exporting so that objects don't suddenly change speed or direction between key frames. This feature can be turned on or off by selecting or unselecting
Auto-Easing in the
Options Window (Animation settings tab under Inbetweening Mode). This parameter is stored in
.piv files along with the other animation settings. Objects will change at a constant rate for inbetween frames when Auto-Easing is disabled and so the transition between key frames may not be as smooth.
Comparison of inbetweening with Auto-Easing enabled (top) and disabled (bottom).
Note: The ball is able to suddenly change direction when it hits the ground with
auto-easing enabled because there is no inbetweening between the last and first frames.
Auto-Easing can only be applied when multiple pairs of frames are inbetweened in a row. If only a single pair of key frames is inbetweened by setting the inbetweens value for a single key frame (with the neighbouring frames set to 0 or -1) then easing cannot be applied. This is because 3 key frame poses are needed for computing acceleration. Auto-Easing is applied to the pose of figures, based on their position and segment angles, and the
virtual camera pose, but is not applied to figure colours or background fading.
Note that it is still possible to make objects move at a constant rate when Auto-Easing is enabled. Simply move the objects by the same amount in the same direction between each pair of key frames and set the inbetweens value of the key frames to the same value. In this way you can make some objects move with acceleration while others move with constant speed by carefully choosing how the objects are positioned in the key frames.
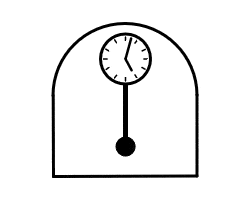
Example
In the following example, key frames have been created in the timeline for a pendulum. The inbetweens values are set to 8, 17, 8 and -1. An additional key frame in the center position could have been added between key frames 2 and 3 so that all inbetween values were set to 8, but instead that key frame can be removed by doubling the previous inbetweens value (+1 for the missing key frame). The inbetweens value of the final key frame is set to -1 so that the pendulum doesn't pause for 2 frames as the animation repeats. The start and end of the animation was chosen to be the pendulum's center pose because this is the only point in the motion where the acceleration is 0. This enables the animation to repeat smoothly with realistic acceleration when auto-easing is enabled.
Timeline of the pendulum animation. The inbetweens values are set to 8, 17, 8 and -1.
The final animation is 36 frames long but requires only 4 key frames.
Auto-Easing enabled Auto-Easing disabled
Creating Sudden Changes when Auto-Easing is Enabled
In some cases easing may not be desirable. For example, when making a ball bounce on the ground in the middle of a sequence, since this requires a sudden change in direction rather than a gradual deceleration and acceleration. The solution is to split the sequence into separate groups of inbetweened key frames separated by a frame with inbetweens value 0 or -1.
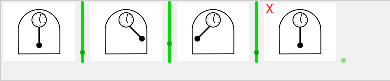
An example is shown below. The first pair of frames forms a group since the 2nd frame inbetweens value is -1. Auto-easing cannot be used in this group because there are only 2 frames, so the motion of the ball will have constant speed as it rolls along the surface. The next 3 frames form a group with easing as the ball falls. The horizontal position of the ball is changed with equal increments so that its horizontal speed is constant. The vertical position is changed with unequal increments so that the ball accelerates towards the ground (a falling object will fall a quarter of the distance in half the time it takes to reach the ground). The next 3 frames form another group with the ball going up and then back down. The ball is able to suddenly change direction as it hits the ground because the inbetweened sequences are separated into groups. An inbetweens value of -1 has been used at the end of each group to separate them and so that the position at the end of one group and the start of another can be set the same without the ball pausing there for 2 frames.

Timeline of the bouncing ball animation. The inbetweens values are set to 14, -1, 5, 5, -1, 3, 3, 0
suddenly changing direction as it hits the ground and then following another parabolic curve