1.5.1. Creating a Basic Inbetweening Sequence
In order to create a sequence with automatically generated inbetween frames, begin by creating at least 2 key frames in the normal way by
positioning and colouring the figures, setting the
background and clicking the Add Frame button to add them to the timeline. Then simply set the
Inbetweens value for each frame. The inbetweens value is shown to the left of the timeline in the
animation frame controls. The value entered in the Inbetweens edit box determines how many frames should be automatically created between the selected key frame and the following key frame when the animation is played or exported. Any differences between the selected frame and the next will vary smoothly while playing, including figure poses, colours,
virtual camera position and the background. The inbetweens value for a key frames is also represented as a green bar between that key frame and the next in the timeline, which can also be dragged as a slider to change the value. The green bar ranges from 0 to 80, but larger values can be entered in the inbetweens edit box if needed.
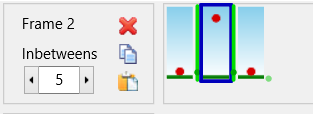
The timeline for a basic inbetweening sequence of a ball moving up and then down with key frame 2 selected.
The green bars indicate that inbetweens have been set. The inbetweens value of frames 1 and 2 is 5.
The Inbetweens value can be set for multiple frames at once. Select multiple frames by using the Shift key while clicking frames or by using the 'Multi Select' option in the right click menu. Then set the inbetweens number and click 'Update Frame'. A message box will ask if you want to apply the change to all selected frames.
Creating Pauses (Frame Repeats)
The Inbetweens box replaces the Repeat box present in previous versions. To create a pause in the animation with no change, simply create two identical frames (right click the frame and select Insert) and then set the inbetweens value of the first frame to set the duration of the pause. This is done automatically when loading animations created using previous versions that contain frame repeats.
Hiding Key Frames
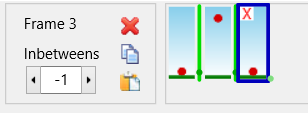
The example shown above suffers from a problem when the animation is played in Loop mode. The animation ends with the same ball position as the first frame, so when the animation loops back to the start the ball will appear on the ground for 2 frames in a row making the ball appear to pause on the ground. One solution to this is to position the ball in the last frame so that it's above the ground, however, we would have to estimate where the ball should be and also reduce the inbetweens value by 1 for the previous frame. A simpler solution is to set the inbetweens value for the last key frame to -1. An X will then appear on that key frame in the timeline to indicate that the frame will not be shown during playing or exporting. The key frame is then only used as a reference for inbetweening (the generated inbetween frames will not be affected).
The timeline of the same animation as above, with the last key frame hidden by setting its inbetweens value to -1.
This avoids the ball appearing on the ground for 2 frames and results in the animation shown on the previous page.
Inbetweening of Angles
Inbetweening of angles is a little different to inbetweening of a figure's position because angles wrap around. Given the angles of a segment between key frames, the program has to decide to rotate the segment clockwise or anti-clockwise. The direction is chosen based on the shortest path between relative angles of the segment. This means that a segment cannot be rotated by more than 180° between key frames relative to the segment it pivots on. Multiple key frames will need to be created in order to perform rotations of more than 180°.
Rotating a stickman anti-clockwise by 360° in increments of 120° using 4 key frames (shown with an outline).
Going directly from the 1st to the 3rd key frame would result in a 120° rotation clockwise.
Tip: Hold the Alt and Ctrl keys while dragging a red handle to quickly rotate a figure in this way.
Segment angles are considered relative to the segments they pivot on while inbetweening. Rotating only a stickman's upper arm for example will not change the relative angle of the lower arm, even if the absolute angle of the lower arm has changed (as shown in the status bar segment info). This means that the absolute angle of the lower arm can change by more than 180° between a pair of inbetweened key frames - for example by rotating the upper arm clockwise by 100° and then rotating the lower arm clockwise by 100°.
Inbetweening of Backgrounds
If
backgrounds are different between inbetweened key frames then the inbetween frames will smoothly fade from one background to the other. This is the case whether the background has been loaded as an image or has been set to a solid colour or gradient by setting the background colour. To avoid fading when changing backgrounds, simply don't inbetween between those key frames (set the inbetweens value of the last frame with the previous background to 0).
Fading from day to night by inbetweening between 2 key frames with different image backgrounds.
The colour of the stickman was also modified between key frames.
Understanding Figure IDs
In order to inbetween figures between key frames, Pivot must know which figure corresponds to a particular figure in other key frames. Pivot does this by assigning an ID to each figure. Each figure in a key frame has a unique ID that matches the ID of the same figure in other key frames. The ID is then used during inbetweening and also for showing
onion skins for the selected figure while editing.
The ID for the selected figure is shown in the status bar at the bottom of the main window. When a new key frame is added to the timeline, the figures keep their IDs. However, if you delete a figure and then add a figure of the same type using the figure selector then it will be given a new unique ID and so will be considered as a new figure that isn't present in other key frames.
The status bar at the bottom of the main window, with the selected figure ID highlighted


If you'd like to add a figure into a key frame with the same ID as a figure in another key frame then this can be done by copying the figure in the other key frame and pasting it into the one being edited. The ID of the pasted figure will be the same as long as there isn't already a figure in the key frame with that ID.
If a figure with a given ID is present in a key frame but not in the next one, and an inbetween has been set, then the figure will be present in the generated inbetween frames but won't be inbetweened and will suddenly disappear when the next key frame is reached. If a figure with a given ID is not present in a key frame but is in the next one, then it will not appear in the generated inbetween frames and will suddenly appear when the next key frame is reached.