1.2.2. Positioning Figures
Basic Pose and Movement
A figure consists of 'segments' (lines, circles or images) connected in a treelike structure by pivoting joints. Click and drag the red handle at the end of each segment with the mouse cursor to rotate it around its pivot and all the segments connected to it. Click and drag the orange 'origin' handle to move the whole figure. In this way you can easily adjust the pose of a figure to any position you want while keeping the proportions of the figure constant.
When unselected, all figure handles will be displayed in blue. A figure can be selected by clicking on it anywhere. Rotating the mouse wheel while holding down the Ctrl key will also change the selected figure.
Drag the orange handle of a figure to move the whole figure
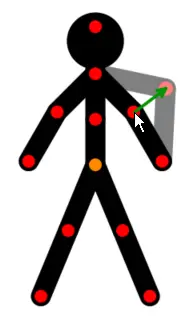
Drag a red handle with the left mouse button to rotate the segment it's at the end of and all segment attached to it
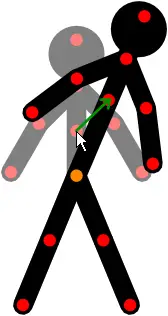
Size / Scale and Rotation

The size of a figure can be changed in two ways. You can set the scale by using the edit box control in the tools panel on the left hand side of the main window (the default will be 100%). The value can be changed quickly by clicking in the box and dragging left and right, or even quicker by dragging up or down. You can also rotate the mouse wheel while the cursor is over the control. Finer adjustments of 0.1 can be made using left / right dragging or the mouse wheel while holding the Shift key.

You can also change the size of a figure by dragging a red handle with the left mouse button while holding down the Alt key on the keyboard, which can be quicker. This can also be used to quickly rotate the whole figure when more than one branch of segments is attached to the orange origin node. The figure will rotate and scale around its origin point at its orange handle.

Holding down the Alt and Ctrl keys at the same time while dragging a red handle will lock the scale so that the figure will only rotate.

Holding down the Alt and Shift keys at the same time while dragging a red handle will lock the rotation so that the figure will only scale.
Drag a red handle while holding the Alt key to rotate and scale the whole figure
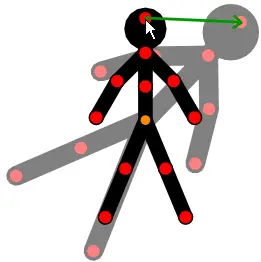
Segment Stretching
In some cases it may be useful to adjust the length of a single figure segment on its own.
This can be done by holding down the Ctrl key on the keyboard while dragging a red handle. The segment handle will then follow the cursor position without being constrained to its default length. This can be useful for creating realistic movements for deformable or stretchy objects as well as creating the effect of 3D movements.
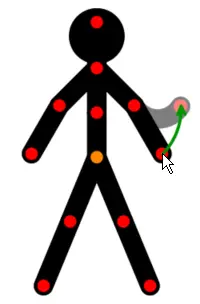
Drag a red handle while holding the Ctrl key to stretch a segment
If Ctrl dragging a segment from a non-default length (the length that the figure type was designed with), then it will snap back to its default length when the cursor is close enough. It won't snap to the default length if the drag is begun from the default length. If the segment is a non-default length and you wish to position the segment close to the default length then it will require two drags of the handle. Firstly drag the handle so that it snaps to the default length, then release the mouse and drag again to the length you require. Snapping does not happen in the figure builder because that's where the default segment lengths are defined.
Handle Repositioning
A handle can be moved so that only that handle and the adjoining segments are changed. No other handle will be affected. This may vary the length of the adjoining segments. This is equivalent to Edit Mode in the Figure Builder. This is different to the Ctrl key which will also move the handles of other segments attached to the one being edited. Also, unlike the Ctrl key, segments will not snap to their default length.
 This is done by holding the R key while dragging any handle.
Drag any handle while holding the R key to reposition a handle without affecting other handles
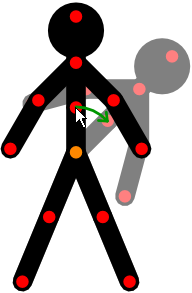
Line Segment Bending
Line segments can be bent into an arc by dragging a red handle while holding the right mouse button. The angle of the line at its pivot and the length of the line will not change. This can only be performed with line segments. This method can be used to create smooth continuous curves when several segments are chained together.
Drag a red handle with the right mouse button to bend the line segment it's at the end of and rotate all segments attached to it
If bending a line from a non-default bend angle (the bend that the figure type was designed with), then it will snap back to its default bend angle when the cursor is close enough. It won't snap to the default bend if the drag is begun from the default bend. If the line has a non-default bend and you wish to position the segment close to the default bend angle then it will require two drags of the handle. Firstly drag the handle so that it snaps to the default bend, then release the mouse and drag again to the bend angle you require. In the figure builder window, snapping always returns the bend angle to 0 (no bend).
Line bending can also be combined with stretching by holding the Ctrl key while dragging with the right mouse button. The angle of the line at the pivot point will not change but the bend angle and segment length will change to keep the handle under the cursor.
Line bending can also be combined with handle repositioning by holding the R key while dragging with the right mouse button. This works differently to the Ctrl key because the angles at the handle being moved won't change, whereas the length, bend and angles at the opposite ends of the attached segments will change. This makes it easier to keep a smooth curve at the handle being positioned.
Fine Positioning Using the Arrow Keys
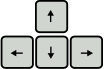
Figures can also be positioned accurately by using the arrow keys to move the selected figure or figures in 1 pixel increments. If the cursor is positioned over a red handle, then this will have the affect of rotating the segment in 1 pixel increments instead of moving the whole figure. The cursor won't move with the handle, but the arrow keys will continue to move that segment until the cursor is moved.
Even finer positioning using the arrow keys can be achieved by first
zooming in. For example, zooming to 400% and pressing an arrow key to move a figure is equivalent to moving the figure by a quarter pixel.
Segment Alignment to Horizontal / Vertical
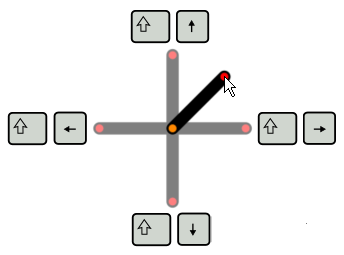
Figure segments can be aligned to horizontal or vertical (right, left, up and down) by placing the mouse cursor over the corresponding red handle, holding the Shift key and pressing an arrow key.
Place the cursor over a red handle, hold the Shift key and press one of the arrow keys to align the segment
Input Values
Sometimes it may be useful to set figures or segments into a specific pose that would be difficult to do only by dragging with the mouse. This may include angles that are not up, down, left or right and so cannot be set using the alignment feature with the arrow keys.

The solution is to position figures to specific values by clicking '
Input Segment Values' or '
Input Object Position' in the Edit menu or by using the 'I' keyboard shortcut. In the figure builder this will edit the selected segment. In the main window this will edit the segment for the red handle under the cursor or the figure position for the orange handle under the cursor. If there is no handle under the cursor then it will edit for the last handle clicked or the selected figures. The angle, bend angle and length, or figure x and y position and z-order, can then be modified and the figure will update as the changes are made. Angle ranges from -180° to 180°, which corresponds to a segment pointing to the left (0° is directly to the right). The segment thickness is also shown if editing in the figure builder. Values can be typed in or increased or decreased by dragging in the boxes or using the mouse wheel over the box. Hold the Shift key to make finer adjustments using the mouse wheel or dragging. The Tab key can be used to step through the values. Note that segment length cannot be set to 0 since this may make it impossible to select the segment again. Click the OK button to apply the changes and close the window or click the cross in the top right corner to close the window and undo any changes that were made. The same trick can be used to position the
virtual camera.
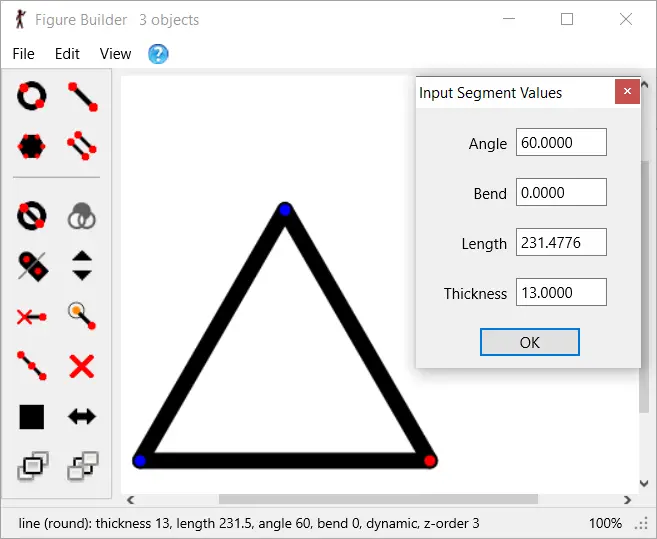
Select 'Input Segment Values' from the Edit menu or press the 'I' key to manually enter values for a segment.
This makes it easy to create perfect shapes such as this equilateral triangle.
Note that this can also be used in the main window.
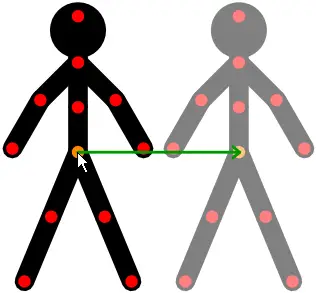
Handle Alignment to Neighbouring Frames
When positioning figures it is often important to keep a particular handle in position relative to the previous or next frame. This is most useful when positioning the foot of a walking or running person to prevent the foot appearing to slip on the ground. To align a handle accurately you could
zoom in to position the handle accurately relative to the
onion skin, however this takes time and is not perfectly accurate.

The quick and easy solution is to place the cursor over the handle you want to position and press the
L key (Locate). This will move the whole figure so that the handle is positioned in the same place as in the previous frame.
Shift+L can be used to locate the handle based on the next frame if editing a frame in the middle of the animation sequence. This only works if a figure with the matching ID is present in the previous / next frame. If a
joined figure is positioned in this way then the whole joined group will move to align the handle. The same trick can be used to align the
virtual camera to the previous or next frame.
+
Handle alignment can be combined with the R key to move only the handle under the cursor to the previous or next frame. Hold down the R key first and then press the L key. This may change the length of the segments joined to the handle under the cursor.