1.3.5. Adding Sprite Images
Sprite images can be loaded into the figure builder and added to the figure type by clicking 'Load Sprite Image' in the File menu. This makes it possible to create realistic looking figures built from multiple sprite images. After loading a sprite you will be given the option of moving the handles so that the sprite pivots at the right point. Once the handles have been moved click the OK button and select a handle to connect the sprite.
The transparency of sprites in the figure builder is the same as described on the
sprite page. PNG transparency is supported, otherwise all parts of the image that share the colour of the bottom left pixel will be transparent.
Repositioning Handles
After loading a sprite image it will be shown in a separate window and with a chequered background to show areas of transparency. The handles can then be repositioned by dragging the orange and red handles. The orange handle will be the pivot point of the sprite (where the center of rotation will be) and the red handle will be the end point
(where other segments or sprites will attach to. For example, if you're loading a sprite image to be used as the upper arm of a person then you would move the orange origin handle to the shoulder and the red end point handle to the elbow.
The selected handle will be highlighted with a black dot at the center. The selected handle can be moved in 1 pixel increments using the arrow keys. Note that the handles cannot be placed directly on top of each other.
Repositioning the handles of a body part sprite
Creating a Realistic Movable Figure from a photo
An image of a person, animal or object can be converted into a realistic moveable pivoting figure. First cut out each moveable part using graphics software.
Gimp is a free graphics application that can do this but is quite complex to use. Microsoft Paint can be used but does not support transparency, so the result may not be as good. Another option is a free and easy to use online photo editing software such as
piZap or
PIXLR.
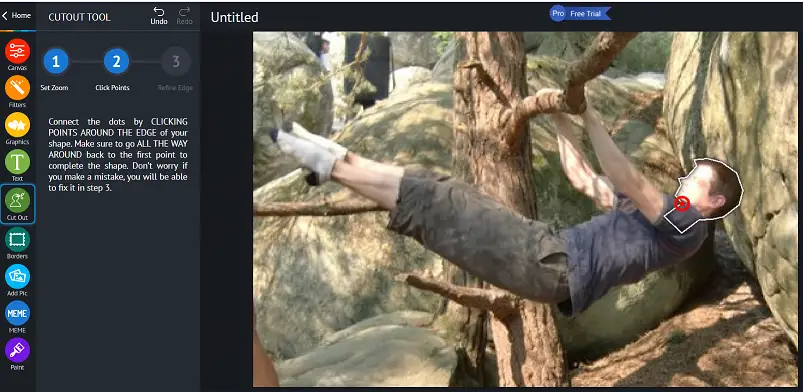
Using the piZap cut-out tool to create body part images with transparent backgrounds

The next step is to load each image part into the figure builder by clicking 'Load Sprite Image' in the File menu. The handles should be repositioned so that each part pivots at the right points. After clicking OK select a handle to attach the new part at the right point.

If some parts of the figure are the same as others, such as arms and legs, then those sprite images only need to be loaded once and can then be duplicated using the duplicate button. This reduces the number of images that need to be stored. Holding the Shift key will allow you to duplicate a whole branch at once (such as upper leg, lower leg and foot).

If some parts are mirror images of other parts, such as a person facing front with mirrored arms and legs, then the Flip / Mirror button can be used. Duplicate a body part while holding the Ctrl key to produce a mirrored copy without the need to use the flip button.


After adding all the parts, you can begin setting the draw order (z-order) so that the parts are in-front or behind other parts as required. Simply select a part and use the Raise and Lower buttons.